Free reverbs have come a long way, and a few of the plugins below would have cost real money not long ago. What you actually need depends on the job: a clean plate or room for vocals and drums, something big and textured for pads and ambient work, or a tool that handles a specific task like reverse swells.
I’ve split this list across all three, from dependable mix reverbs like Wave Alchemy Magic7, UAD Pure Plate and the Dragonfly bundle to sound-design engines like Valhalla Supermassive, Dawesome SOL and epicCLOUDS.
Before you install everything, check the formats, because a couple of these are Windows-only or have known quirks on certain Mac and DAW setups.
Whichever ones you end up keeping, I’d run them on sends rather than inserts and cut some low end from the tail, since that one habit does more for a clean mix than switching between reverb plugins ever will. Now, let’s get started:
1. Variety Of Sound epicCLOUDS
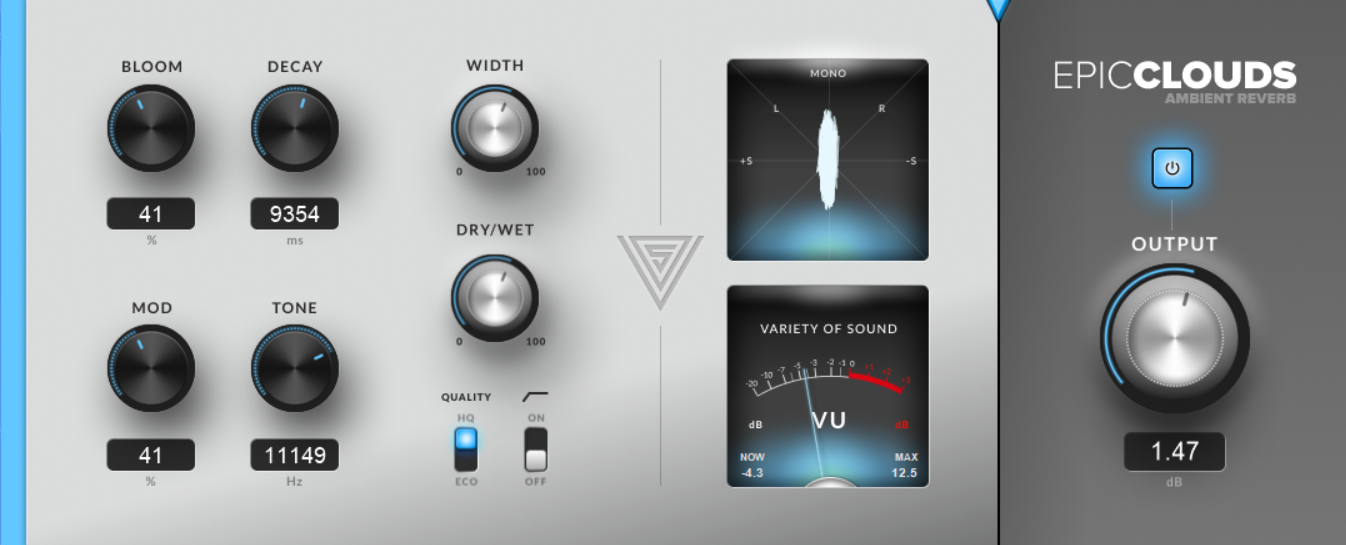
Variety Of Sound epicCLOUDS is an ambient reverb built around very high reflection density and smooth, enveloping tails rather than a selection of room models. It’s freeware for Windows in VST and VST3 formats, so Mac users will need to look elsewhere.
With only five main controls, it’s quick to learn, and most of the character comes from how Bloom and Decay interact. I wouldn’t use it as an all-purpose mix reverb for drums or a vocal that needs to stay upfront, because it’s designed to push sounds into a wide, soft space.
- True-Stereo Processing
The signal stays true stereo from input to output, instead of being split into two separate mono reverbs. Variety Of Sound designed it this way to make the source feel more surrounded by the space, rather than just spread out left and right.
You’ll notice the difference most on stereo sources like wide pads, stereo piano or doubled guitars, where the reverb follows the placement of the original sound. For mono sources like a single vocal, the effect is more subtle, but the tail still feels more even across the stereo field.
- Bloom
At low settings, Bloom acts a bit like a gradual predelay, letting the start of the sound through before the reverb builds up. That’s useful on vocals and piano, where you want the attack to stay clear and the space to arrive slightly after.
As you turn it up, it changes how the reflections are distributed, and the tail becomes a slowly evolving texture rather than a simple decay. I’d set Decay first, then bring Bloom up gradually, since higher Bloom values also make the reverb feel longer than the Decay setting alone suggests.
- Decay Up to 60 Seconds
Decay is set as RT60 from 1 to 60 seconds, which goes far beyond what you’d need for normal rooms or halls. The long end is meant for ambient beds, drones and sustained textures rather than traditional mixing.
For most musical uses, I’d stay somewhere in the few-seconds range and let Bloom add length if needed. The very long settings work best on a separate send with the reverb fully wet, so you can automate its level and filter it without affecting the dry sound.
- Modulation From Density to Pitch Movement
At low values, Mod mostly adds consistency and thickens the tail, smoothing out any metallic or grainy character. That’s the setting I’d use for piano, strings and vocals, where obvious pitch wobble would sound out of place.
Higher values introduce clearly audible pitch movement in the tail, which suits pads, drones and lo-fi textures. Because the effect gets noticeable quickly, it’s worth adjusting it while listening to the reverb on its own and then checking it in the full mix.
2. Native Instruments RAUM
Instead of a long list of room models, this reverb gives you three engines that each behave differently: one for rooms and chambers, one for halls, and one for more experimental effects. It’s a free download from Native Instruments and runs as a plug-in on Windows and macOS.
Because there are only three engines, getting a sound you like with Native Instruments RAUM is mostly about picking the right engine and then adjusting Size, Decay and the filters. I find that quicker than auditioning dozens of presets, and it makes it easier to understand what each control is actually doing.
It works well as a general mix reverb on a send, but it also covers sound-design jobs like drones and risers thanks to the Cosmic engine and Freeze. Keep in mind that NI doesn’t list a clear preset count, so it’s better to think of it as a reverb you shape yourself rather than a preset library.
- Grounded Engine
Grounded is the room and chamber engine, with strong early reflections and a dense tail. Its size range goes from small ambience up to large chambers, so the same engine can give a snare a bit of air or put a whole drum bus in a sizeable room.
I’d use it on drums, acoustic guitars and vocals when you want them to sound like they were recorded in a real space rather than covered in reverb. Keeping the Decay short and letting the early reflections do the work is usually enough to add depth without pushing things back in the mix.
- Airy Engine
Airy covers halls and cathedral-style spaces, with more spread-out early reflections and a smoother tail than Grounded. That makes it the better choice for pads, strings, piano and slower vocals that need length and width.
Long hall tails can build up quickly in the low mids, so I’d trim some low end with the Low Cut and use Damp to soften the top. That keeps the tail behind the source instead of competing with it.
- Cosmic Mode
In Cosmic, the reverb sits inside the predelay feedback loop, so each echo gets passed back through the reverb and becomes more diffuse each time. The result ranges from blurred echoes to resonant, abstract textures, depending on how far you push the feedback.
- Freeze With Live Size Control
Freeze holds the current reverb tail indefinitely on the Grounded and Airy engines. While the sound is frozen, you can still change Size, which shifts the character of the held tail instead of leaving it static.
3. VAS Reverse Reverb
Reverse reverb usually means reversing a clip, adding reverb, rendering it, reversing it again and then nudging it into place on the grid. That whole routine is what Vandeta Audio Software automated with VAS Reverse Reverb, a free tool released on September 14, 2026 for Windows and macOS in VST3, plus AU on Mac.
It’s worth knowing upfront that it doesn’t work like a normal reverb insert. You don’t leave it running on a track; instead, it renders an audio clip in the background that you drag back into your DAW, so I’d think of it as a transition generator rather than something to compare with RAUM or other mix reverbs.
- Tempo-Synced Lengths
You choose between 1, 2, 4 or 8 bars, and the swell is synced to your host tempo so it lands on the right downbeat. That removes the trial and error of stretching or trimming a reversed tail until it lines up with the hit.
For most transitions, 1 or 2 bars works for a vocal or snare lead-in, while 4 or 8 bars suits longer builds before a drop. If a swell feels too long once it’s in the arrangement, re-rendering at a shorter length is quicker than editing the clip by hand.
- Capture or Load, Then Drag Out
You can load a one-shot or audio file, or capture audio directly from a track in your session. That means you can use the exact vocal phrase, chord stab or snare from your project rather than exporting it first.
Once rendered, the clip is already grid-aligned, so you drag it onto a track and it sits in the right place. Because it’s regular audio, you can still process it further, cut it or layer it with other risers like any other clip.
- Mirror Mode With X-Fade
Mirror creates a symmetrical rise and release around the original sound, so you get the reverse swell into the hit and a normal tail after it. That’s handy for vocal hooks or stabs where you want the effect to feel balanced rather than just leading in.
The Mirror X-Fade controls how the rise and release blend around the original hit. A shorter crossfade keeps the transient clear, while a longer one gives a softer, more washed-out shape.
- Reverse Only Mode
Reverse Only gives you the reversed riser without the full reverb treatment. It’s useful when you want a reversed sound as a lead-in but don’t need a big wash, such as a reversed cymbal or a clipped vocal word.
I find it works well layered under a reverse reverb render, since the dry reversed sound adds definition while the reverb version adds space. It also keeps things tighter in busy arrangements where a full reverb swell would muddy the mix.
- Tremolo for Movement
The built-in Tremolo adds rhythmic volume movement to the swell. Long reverse tails can sound static, and a bit of tremolo makes them pulse along with the track.
It’s especially useful on 4- and 8-bar builds, where a steady swell can feel flat over that length. I’d keep the depth moderate so the rise still reads clearly, then let the rest of the arrangement carry the energy.
4. Wave Alchemy Magic7
Some reverbs try to cover everything from realistic rooms to sound design, but this one focuses on recreating a classic studio unit. Wave Alchemy Magic7 is based on the sound and program structure of the Bricasti M7, with some extra processing that Wave Alchemy added on top, and it’s free in VST3, AU and AAX on Windows and macOS, with native Apple Silicon support.
It works on almost anything, from vocals and snares to pianos and full mixes, and the workflow is closer to picking a program on a hardware unit than building a sound from scratch. That makes it quick to get something usable, which is exactly why I keep it as my default mix reverb.
- 234 Bricasti M7 Programs
I like that the 234 presets are actual M7 programs, not a set of new presets loosely inspired by the hardware. The list reflects how the original unit was organized, which sets it apart from other free reverbs with modern preset libraries.
The programs are split across 11 reverb types: Ambience, Chambers, Halls 1 and 2, Nonlin, Plates 1 and 2, Rooms 1 and 2, and Spaces 1 and 2. Plates suit vocals and snares, Rooms and Chambers work well on drums and guitars, and Halls fit strings and piano.
The Nonlin category gives you tight, gated-style tails on drums without setting up a separate gate. It’s a quick way to get that cut-off reverb sound on a snare or tom.
- Smooth Transient Processing
Smooth reduces how much of the transient feeds into the reverb, while leaving the dry signal untouched. Sharp attacks from snares, plucks or vocal consonants can make a tail sound thin or slightly metallic, and this helps avoid that.
It’s most useful on percussive sources and bright vocals, where you want a thicker, softer tail without losing the punch of the original sound. The dry hit stays exactly as it was, so only the reverb character changes.
- Flux and Ensemble Modulation
There are two modulation styles, Flux and Ensemble, and I switch between them depending on how much movement a part needs. A bit of modulation stops long tails from sounding static or grainy, especially on sustained sounds.
- Ducking
Ducking lowers the reverb level while the dry signal is playing and lets it come back up in the gaps
5. Dawesome SOL
For pads, drones and guitars that need movement rather than a room, I’d reach for Dawesome SOL. Developed by Dawesome with S1gns Of L1fe, it pairs a granular processor with a Clouds-style ambient reverb, and it’s a full free download in AU, VST3 and AAX on macOS (Intel and Apple Silicon) and VST3 and AAX on Windows.
Room emulation isn’t part of the design at all, so putting it on a snare or a lead vocal that needs a realistic space will disappoint you. Everything runs through six controls, and the sound you get depends mostly on how the granular side and the reverb side are balanced against each other. Sustained sources respond best, while short, dry hits tend to get lost in the texture.
- Glitter and Calm
Glitter brings in the granular layer, a constantly shifting, grainy texture built from your input. On a held synth chord or a clean guitar, even a small amount turns a static sound into something that feels alive.
Calm slows and smooths that movement. With Calm low, the grains flicker quickly and can get busy; with it higher, the texture drifts more gently and sits further back.
My usual starting point on pads is moderate Glitter with Calm turned up quite a bit, which adds motion without distracting from the part. On plucks, I back Glitter off, since too much of it smears the attacks.
- Shine
Shine adds pitched grains one or two octaves above the source. Lower settings give a faint sparkle on top, while pushing it harder produces an obvious shimmer layer.
Keep an eye on the high end when using it on bright material, because octave-up grains stack quickly on vocals and cymbal-heavy mixes. Pulling Color toward the darker side helps if the shimmer starts to sound harsh, and I find a little Shine goes a long way on anything that isn’t a pad.
- Clouds and Space
Clouds sets how much of the ambient reverb you hear and how dense it gets. Space controls the depth and spread of that wet sound, and it effectively decides how large the cloud feels and how long it hangs around.
Keeping Clouds low with Space high gives a thin, wide haze behind the dry signal, which suits vocals and guitars. Raising both turns the source into a thick wash, closer to a standalone ambient bed than an effect, so I’d do that on a send or bounce it to audio for transitions and intros.
6. TAL-Reverb-4
Plate reverbs from 1980s digital units have a particular sound: smooth, dense, slightly synthetic, with a gentle wobble in the tail. That character is the whole focus here, since TAL built it as a single high-quality plate rather than a collection of rooms and halls, and the current version is 4.0.4.
TAL-Reverb-4 builds up quickly even with long tail settings, so the reverb arrives almost immediately instead of swelling in slowly. On vocals, snares and synth leads, I like how that keeps the space tight to the source while the tail still stretches out behind it.
One practical limitation: it only works on stereo channels. For a mono vocal or bass, put it on a stereo send or bus rather than directly on the track, which is how I’d run it anyway. Formats cover VST, VST3, AU, AAX and CLAP on Windows, macOS and Linux, with native Apple Silicon support.
- Vintage Plate Character
The tail is very diffuse and lightly modulated, which gives it that polished, slightly artificial 80s quality instead of a realistic room. Synth-pop, synthwave and retro-leaning productions are where it sounds most at home, but it also works as a plain vocal plate in modern mixes.
For a darker, less glassy tail, turn up Damp, which arrived in version 4.0.2. My habit is to set Damp first and then adjust Size, because the brightness of a plate often decides whether it sits in the mix or sticks out.
- Tune
Tune includes a pitch shifter that moves the reverb tail up or down. Small amounts can make a plate feel slightly thicker or detached from the source, while larger shifts turn it into an obvious effect.
- Bit Depth and Sample Rate
A lo-fi section with separate bit depth and sample rate controls lets you degrade the reverb deliberately. Instead of a clean plate, you can get something grainy and gritty that sounds closer to early digital hardware or sampler reverb.
Since only the reverb gets crushed, the dry signal stays clean. I find that useful for lo-fi hip-hop, chiptune-flavored synths and retro drums, where a dirty tail adds character without trashing the main sound.
- Harmonic Engine and Ducking
The harmonic engine adds coloration to the reverb, giving the tail a bit more body and saturation. Combined with the Ducking mode, which pulls the reverb down while the input is playing, you can use a long, colored plate on a vocal without it clouding the words.
7. Stone Voices Ambient Reverb
Dense ambient tails usually come with a trade-off, because many reverbs get there by smearing sound through audible grains or obvious modulation.
Stone Voices took a different route with version 2.1, building a high-density algorithmic reverb whose reflections pile up without that grainy texture, and it still handles ordinary rooms when you pull the settings back. It’s free in VST2, VST3 and AU for Windows and macOS, with 40 factory presets to start from.
The manual lists 23 parameters in six groups, plus two extra toggles (Wet Only and Pre Tank), so it’s more hands-on than most free options in this roundup. My advice with Stone Voices Ambient Reverb is to skip the filter and damping sections at first and spend time with the stereo and freeze controls, because that’s where it differs from everything else here.
- Split and Extra-Wide Stereo
Split decides what actually feeds the reverb: the full stereo input, only the mid, only the sides, or a blend. Width goes past normal stereo as well, with 100% as standard and 200% as super-wide.
- Freeze With Input Block
Freeze holds the tail indefinitely, which on its own is common enough. The detail that makes it more usable is Inp Block, which stops new audio from entering the frozen reverb.
- MIDI CC Control
Several parameters come mapped to MIDI CCs out of the box: CC64 for Freeze, CC71 for Size, CC74 for Diffusion, CC76 and CC77 for modulation rate and depth, and CC78 for Decay.
8. Platone Studio Flex Reverb
Reverb plugins packed with controls can slow you down when a part only needs a bit of plate. Plenty of producers also end up adding an EQ after every reverb send, which means one more plugin to open and adjust on each track.
A short, predictable chain tends to work better for everyday mixing. A plate, an EQ to tidy up the tail and a wet/dry balance handle a large share of vocal, snare and acoustic guitar reverb jobs.
That entire chain comes in one window with Platone Studio Flex Reverb, a free plugin in VST, VST3 and AU formats. There are no modes or preset banks to learn, so I load it whenever I want the reverb decision made in seconds rather than minutes.
- Graphic EQ After the Plate
Plate tails usually cause two problems: low-end buildup that blurs the kick and bass, and a bright, slightly harsh upper midrange on vocals and snares. A graphic EQ placed right after the plate lets you see and pull down the exact band that’s causing trouble, without sweeping a parametric filter around to find it.
I usually start with a low cut, then a dip in the upper mids, and occasionally a small lift at the very top for air. A darker, rounder tail for a slow ballad or a thinner, brighter one for an uptempo track is only a few slider moves apart.
- Plate, EQ, Mix and Nothing Else
The signal flow is fixed: plate reverb, then graphic EQ, then mix. With so few steps, every change you make is easy to hear, and there’s no chance of a hidden setting in another tab changing the sound.
For beginners, that makes it a good tool for learning how EQ affects a reverb tail. Once you hear how much cleaner a vocal gets after cutting the lows from its reverb, that habit carries over to every other reverb you use.
- Runs on Older Systems
Support goes back to Windows 8.1 and macOS 10.9, and it runs on Intel, AMD and Apple Silicon processors. Many newer plugins have dropped older operating systems, so this is handy if you’re on an aging studio computer or a laptop you haven’t updated in years.
It also makes sense for shared setups like school labs or practice rooms, where machines often run older software. You can install the same reverb everywhere and get consistent results.
- Tiny Install Size
The plugin weighs just 5.78 MB and lists a 2 GB RAM requirement
9. Valhalla Supermassive
Put this on a send when you want the effect to be part of the sound rather than just a space around it. Delays, echoes and reverb all come from the same engine, so a single instance can go from a rhythmic vocal throw to a slow wash under a pad without switching plugins.
Valhalla didn’t design it to imitate rooms, plates or halls, and it shows when you start turning knobs, since small moves often change the character completely. The current release of Valhalla Supermassive is version 5.0.0, free on Windows as 64-bit VST2, VST3 and AAX and on macOS as VST2, VST3, AAX and AU, including native Apple Silicon builds.
Expect to spend some time experimenting before it clicks. I’d treat it more like a synth for effects than a mix reverb you set once and forget.
- 22 Modes Across Very Different Behaviors
The mode list now runs to 22 options, grouped roughly into sparse echoes, modulated delays, huge reverbs, dense atmospheric tails and, in the newer additions, more conventional-sounding reverbs. Switching modes changes the underlying delay network, so each one responds to the same knob settings in its own way.
On vocal throws and guitar leads, the sparse echo modes are a good place to start, since you can hear individual repeats. For pads and drones, the huge and atmospheric modes go much further, and I usually audition a few with the same settings before tweaking anything.
- Sirius Mode
Added in version 5 alongside Pleiades as one of the newest modes, Sirius aims for cleaner, clearer reverb than the earlier, more extreme modes. It combines a fast attack, a smooth decay and filtered feedback, with echo density that can go from low to very high.
The filtering is what makes it useful on normal mix sources. High frequencies fade more naturally as the tail decays, and the low end thins out over time, so vocals and piano get a big space without the tail turning boomy or brittle.
It can still reach very large spaces if you push it. For me, that makes Sirius the mode to try first if you’ve avoided Supermassive because the older modes felt too wild for everyday mixing.
10. Dragonfly Reverb (bundle)
Linux users don’t get many good free reverbs, and plenty of Windows and Mac producers prefer open-source tools they can rely on long term. This bundle covers both groups, released under GPL-3.0 for Windows, macOS and Linux, with 3.2.10 as the latest tagged release on GitHub.
Rather than one plugin with modes, you install four separate reverbs, each loaded on its own. In practice, I like that setup for building a proper reverb bus system, with a short space on one send, a longer tail on another and a plate reserved for vocals.
One caveat before you commit to it: the GitHub project has open reports about compatibility and interface scaling on some macOS and DAW combinations. Test it in your own host first, especially on a Mac, rather than assuming it will behave the same everywhere.
- Early Reflections Only
The most unusual plugin in the set gives you only the early reflections, with no late reverb tail at all. It uses a Moorer early-reflection model, with 8 reflection programs plus size, width and filters.
- Hall With Early/Late Balance
The Hall plugin combines Moorer-style early reflections with a modified FDN, Zita-style late reverb, and you can set the balance between the two. More early energy keeps a source present, while more late reverb pushes it back into the space.
You get 25 factory presets across 5 banks covering rooms, studios, and small, medium and large halls. On Dragonfly Reverb Hall, I’d start from the Studios or Small Halls banks for vocals and acoustic instruments, then move to the larger halls for strings and pads.
- Room With Spin and Wander
Room pairs Moorer early reflections with a Dattorro Progenitor-style late reverb, designed for sizes of roughly 8 to 32 meters and decays from 0.1 to 10 seconds. Its 25 presets in 5 banks run from small and medium rooms to halls and effects.
Spin and Wander control the modulation, adding slow movement to the tail so longer settings don’t sound static. Keeping both low suits drums and guitars, while a little more helps sustained sounds like keys and pads.
- Plate With Three Algorithms
The Plate plugin lets you switch between NRev, NRevB and STRev, with 8 presets to start from. Each algorithm gives the plate a slightly different density and tone, so it’s more flexible than a single fixed plate.
Trying all three on the same vocal is the quickest way to hear the differences. Once I’ve found the one that suits the voice, the damping and cut filters are enough to fit it into the mix.
11. UAD Pure Plate Reverb
When I want a vocal to sound like a classic record rather than a modern production, a steel plate is usually my first choice. UAD Pure Plate Reverb is Universal Audio’s model of one, and UA says it captures how the plate, its transducers and its damping system behave together, not just a generic plate-style algorithm.
It comes in two versions: UADx Pure Plate, which runs natively on macOS and Windows without any UA hardware, and the UAD-2 version for UA’s DSP systems. I use the native one, since it loads like any other plugin and doesn’t tie me to an interface.
Compared with the creative engines earlier in this list, it does one job. I reach for it on vocals, snares and horns when I want the dense, bright-but-smooth plate sound that’s been on records for decades.
- Mechanical-Style Reverb Time
Reverb Time runs from 0.5 to 5.5 seconds in 0.1-second steps, and it works like adjusting the damping on a real plate. Short settings give a tight, splashy sound that suits snares and percussion, while longer ones open up into a smooth tail for ballads and slower vocals.
- High-Pass at 90 or 180 Hz
The plate has a switchable high-pass filter at 90 Hz or 180 Hz, with a 12 dB/octave slope, or you can leave it off.
- Artist Presets
UA includes presets from engineers and artists such as Patrick Carney, Richard Chycki and Chuck Zwicky. They’re a practical way to hear how experienced people set up a plate for different sources, which I find more useful than generic names like “Vocal Plate 2”.
When I’m not sure where to start, I load a couple of them on the same part and compare. Even if I end up changing the settings, they show me the kind of decay and tone balance that tends to work on that instrument.
12. Analog Obsession Room041
Analog Obsession built its name on free emulations of classic studio hardware, so it’s easy to assume its first reverb copies a specific vintage unit too. It doesn’t: version 2.0, released on September 24, 2024, is an original algorithmic design with a signal chain modeled loosely on how hardware reverbs were wired into a studio.
You can download it as donationware, so it’s free with the option to support the developer. Mac users get VST3, AU and AAX Native with Apple Silicon support, and Windows users get VST3 and AAX Native.
If you already use other Analog Obsession plugins, the workflow will feel familiar, with a simple front panel and a character-first approach to sound. Most of what makes it different happens before and after the reverb itself, which is why I think of Room041 as a reverb channel strip more than just a room.
- Tube-Style Drive Before the Reverb
A Drive control with ±24 dB of range sits at the start of the chain, based on the input stage of tube-driven reverb lines. Turning it down keeps the reverb clean, while pushing it up adds grit and saturation to what enters the room algorithm.
- ±24 dB Post-EQ
After the reverb, you get a Low and a High band, each with ±24 dB of range. That’s far more than the gentle tone controls most reverbs offer, so you can reshape the tail dramatically.
With big cuts, I can make the reverb thin and bright or dark and distant, depending on where the part needs to sit. Large boosts are possible too, but I use them carefully, since they can quickly make the tail louder than the source in certain frequency ranges.
Besides the regular plugin formats, Room041 is also available as AudioSuite on both Mac and Windows. In Pro Tools, that means you can render the reverb straight onto a clip instead of running it live.

Hi, I’m Peter. Plugin Nomads started after I’d bought one too many plugins because of hype, and some of them sounded amazing in the demo video but did nothing at all for my mixes..